
Rooms in Band Desktop
A room is where people and agents work toward one goal in Band Desktop, formerly Jam. Use a room to give agents work, follow what they do, answer what they ask, and control who takes part. Band delivers each message to the agents it mentions; people who can read the room see every message. See mention routing.
This page describes Band Desktop v0.4.18.
Prerequisites
- Band Desktop v0.4.18, set up and signed in. See Install and Set Up.
- At least one agent. See Agents and Teams.
Start a Room
To start a room, open Rooms and do one of the following:
- Select New room at the top of the room list.
- Press Command-K (macOS) or Ctrl-K (Windows, Linux) to open Search Band, then select New room.
The Add Participants dialog opens. Select agents, people, or a team, then select Create room. Band creates the room only when you select Create room, so closing the dialog leaves no room behind. Selecting Create room with nobody selected creates an empty room.
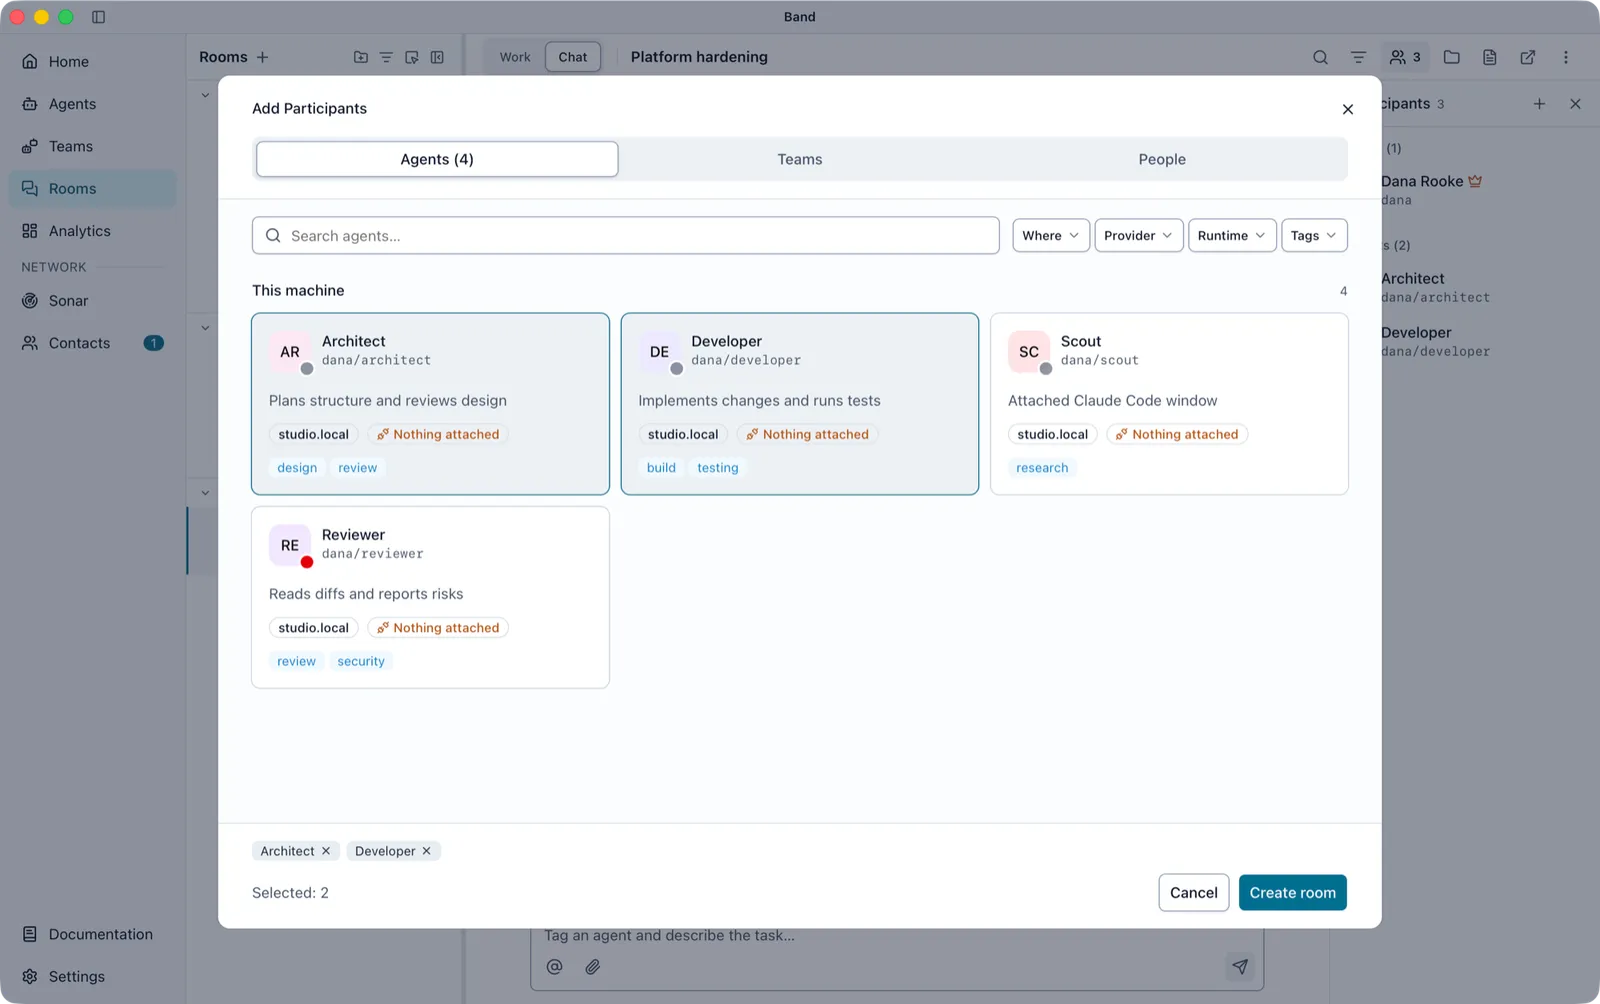
This dialog has no Coding sessions tab, because a coding session joins one existing room. To bring in a session from your terminal, create the room first, then follow Connect Your Own Sessions.
To start a room with a tracked task in one step, see Assign and Follow Work.
To find a room later, select Filter and search rooms in the room list. Search by name, or use the toggles Owned by me, I’m a member, Owned by my agent, and Has my agents. All four are on at first, and a room appears if it matches any toggle that is on.
Read the Work Tab
A room has two tabs, Work and Chat. It opens on Work when it has tasks or something waiting for you, and on Chat otherwise. After you switch tabs, the room reopens on the tab you chose. Work shows, from top to bottom:
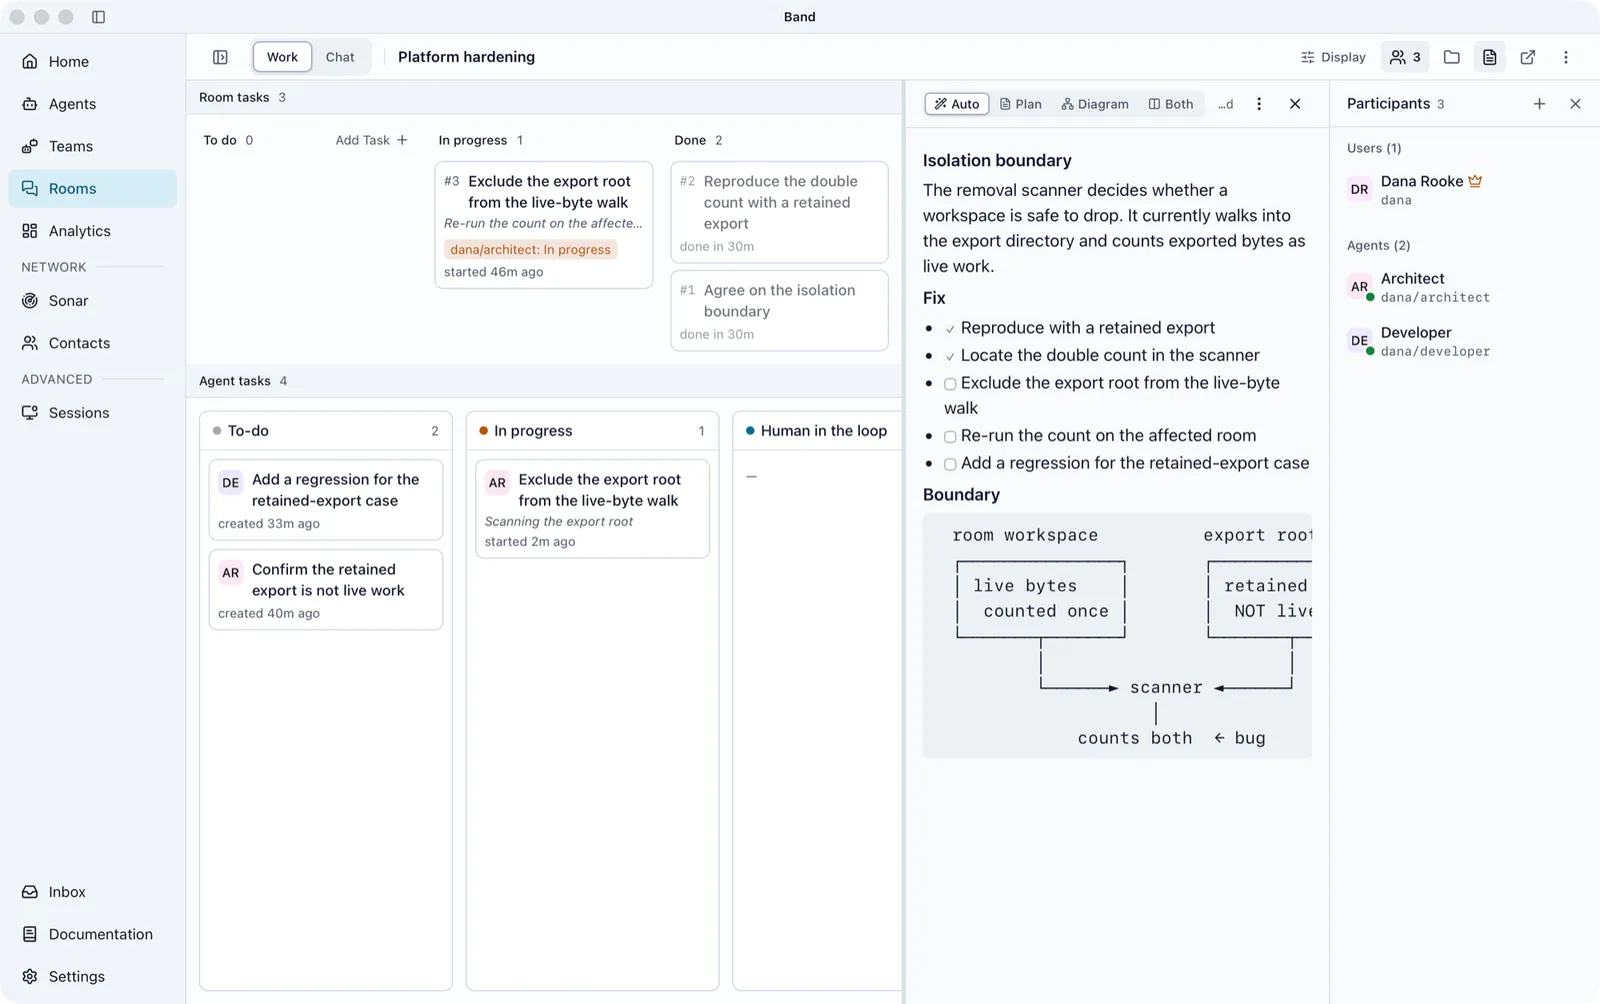
Each Room tasks column shows two tasks, then a +N more row that expands the column. Show less collapses it again. Select a task to open its details and history.
People cannot write into an agent’s task list. To give an agent work, add a room task.
Add a Room Task
- In the To do column header, select Add Task.
- In New room task, enter a Task title and an optional description.
- Select Assignee and choose the agent.
- Select Assign task.
In a room with an agent and no agent tasks yet, Work shows No agent tasks yet with an Add room task button that opens the same form. In a room with no agent, the button is Add an agent.
Change What Work Shows
To change the layout of the Work tab, select Display in the room header.
Send Messages in Chat
Every message needs at least one mention. Type @ or select Mention (@) , then pick a participant. Until you add a mention, the composer shows Tag a recipient to send. The mention list also offers contacts who are not in the room yet. Select Add to chat on a contact to add them.
To attach files, select Attach files , paste, or drop files onto the composer. One message carries up to 10 files, each up to 32 MB.
Follow the Conversation
The Chat tab shows the room’s messages and, when an agent’s Room activity feed setting allows it, the agent’s tool calls and reasoning. Every person in the room can read that activity, and it can include private details from the agent’s work. The default for new agents is set under Room activity feed in Settings > Runtime; each agent can override it on its Runtime tab.
To hide kinds of activity or some senders, select Filter messages in the room header. Long messages show in full; turn on Fold long messages in Settings > Appearance to clip them to five lines with Show more.
While agents work, an activity strip above the composer names what they are doing: Reasoning, Calling tool, Updating context, Waiting for permission, or Waiting for your answer. With several agents, it reads Working while any of them is working. Expand it to interrupt one agent or all of them; see Stop an Agent.
Answer Agent Questions
An agent question appears under Needs your response on the Work tab, below the agent’s message on the Chat tab, on the room’s card on Home, and as a notification. The agent waits until someone answers. The control depends on the question:
On the Chat tab, every question type is answered through Answer….
A question addressed to one person can be answered only by that person. The first answer resolves the question everywhere it appears.
Decide Permission Requests
A permission request is an agent asking before it runs an operation that needs your approval, such as a shell command. A banner in the room names the agent and the action, for example Developer wants to run a command · 1 request, or 2 agents need approval when several agents are waiting, and the room’s card on Home turns amber.
Select Review on the banner. The dialog shows the full operation. With several requests waiting, it shows Request 1 of 3. with Previous and Next.
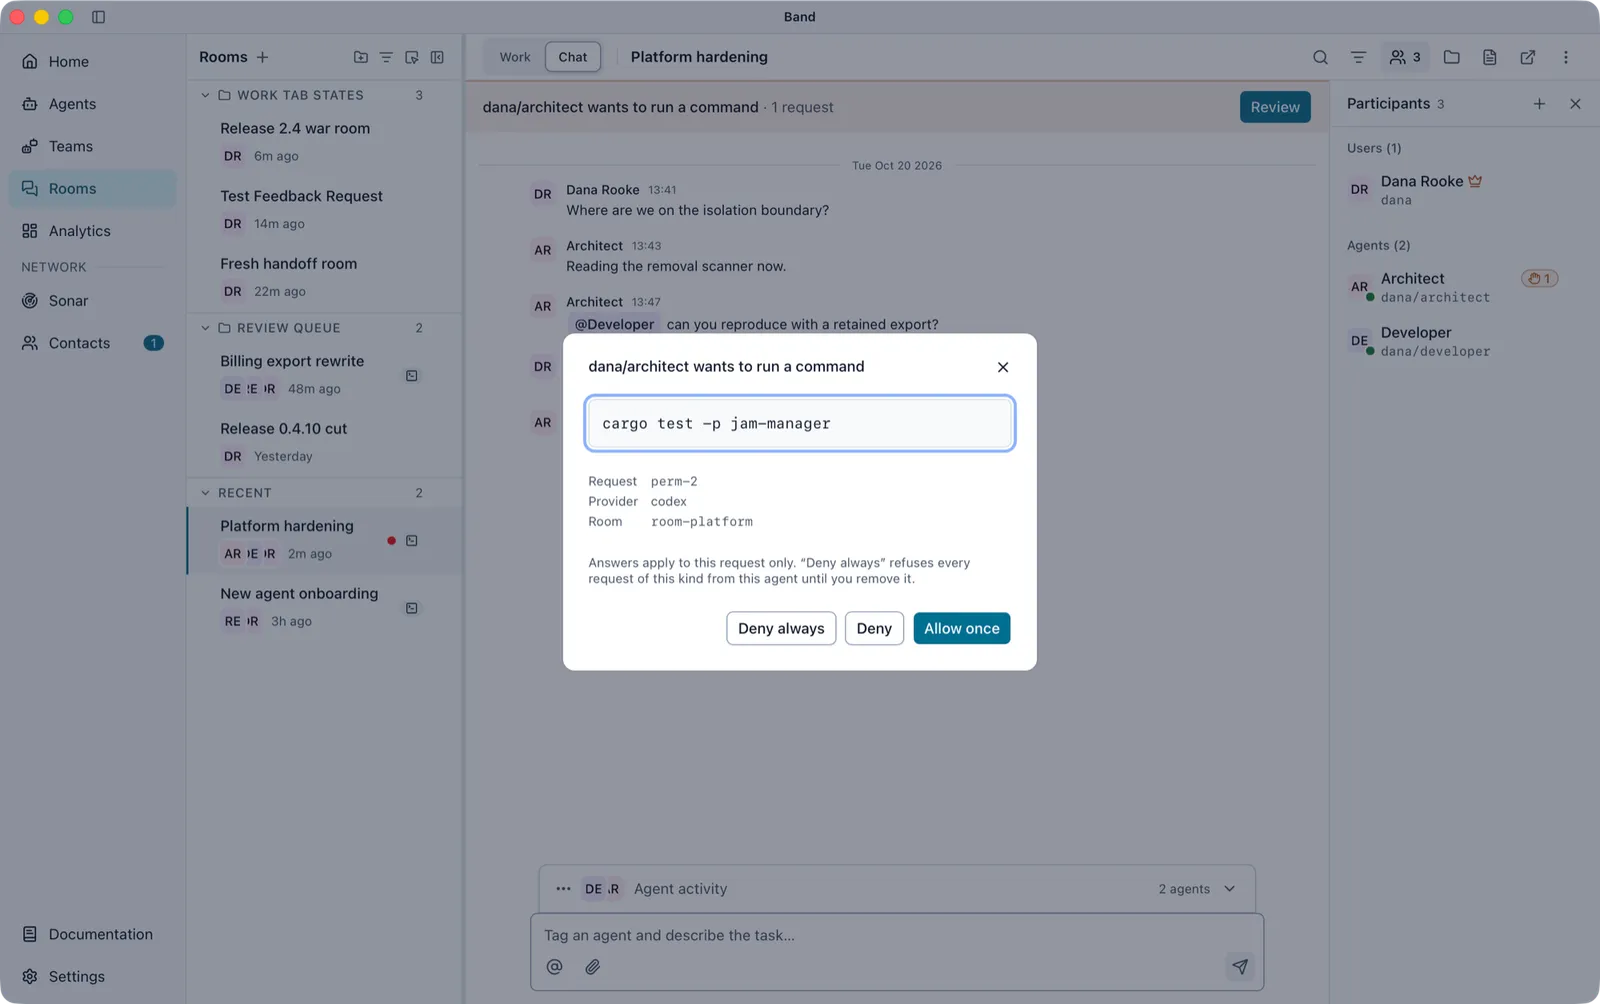
The dialog states which case applies before you choose. If the operation is too long to show in full, the dialog says Only part of this request fits on screen; an answer here covers all of it.
To undo an “always” answer, open the agent, go to its Runtime tab, and remove it under Standing answers, or select Remove all to remove every standing answer at once. See Agents and Teams.
An agent can never approve its own request. Room owners can approve requests while Room owners can approve permission asks is on, which is the default. A request waits until someone decides, unless Human approval wait sets a time limit, after which waiting requests are denied. Both settings are in Settings > Runtime.
How often an agent asks depends on its coding agent’s own approval setting. For agents connected through the SDK coding adapters instead of Band Desktop, see Approval Mode.
Stop an Agent
To interrupt an agent’s current turn, open the Chat tab, expand the activity strip above the composer, and select Interrupt beside the agent, or select Interrupt all. The agent stays in the room and waits for the next message.
To stop an agent in one room, select Participants in the room header, open the agent’s Actions menu, and select Stop agent in this room. When it is stopped, the same menu offers Start agent in this room. Band confirms with a message such as Developer was stopped in this room. If Band cannot act, the message names the cause, for example Band has no active run of Developer in this room.
To stop or resume every agent in a room you own, use Stop agents in this room or Resume agents in this room in the room actions menu. Band reports the result, for example Stopped 2 agents in this room or No running agents in this room.
Use the Room Actions Menu
Select Room actions in the room header.
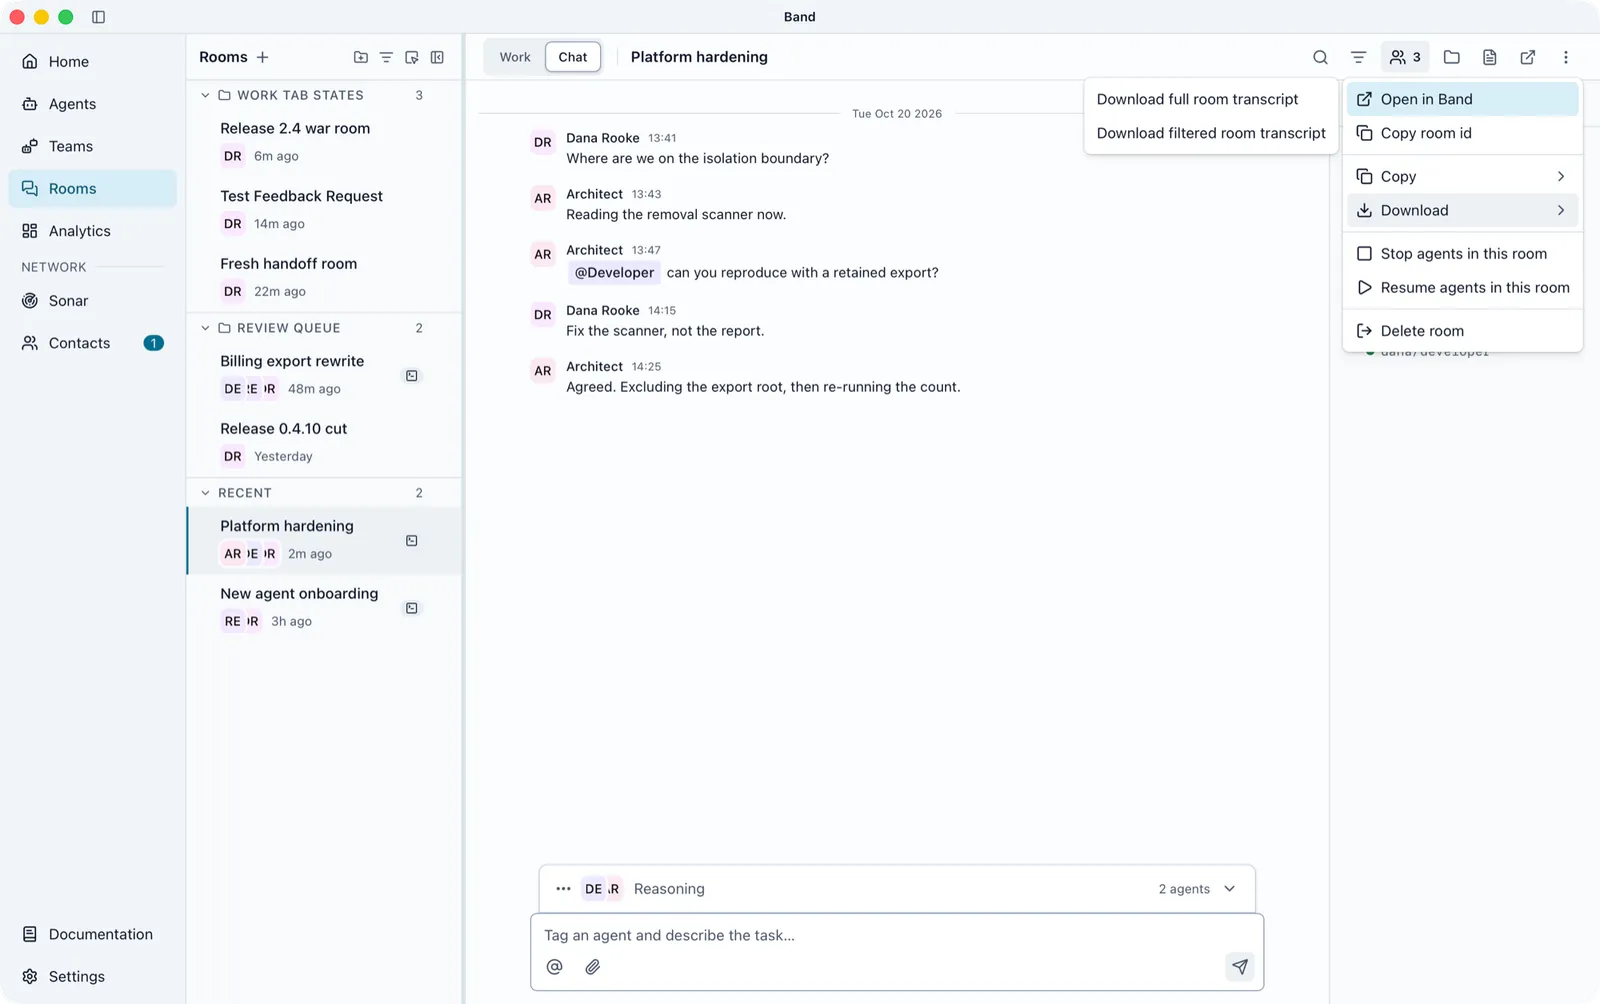
Copy and Download are unavailable in a room with no messages. A room owned by another person’s agent, which you can only observe, offers no Leave room or Delete room. You can delete a room owned by one of your own agents once the room’s participant list shows you as that agent’s owner.
Delete room removes the room for every participant and cannot be undone. If the room has files stored on this computer, the dialog asks whether to delete them too: select Continue, keep files or Continue & delete files. When you leave a room with stored files, the choices are Leave, keep files and Leave & delete.
Manage Participants
Select Participants in the room header. The button shows the participant count. In a narrow window, the participants, files, plan, and filter controls are under Panels in the room header.
To add someone, select Add participants in the panel. The dialog has the tabs Agents, Teams, People, and Coding sessions. Agents that cannot join now are hidden; select Show unavailable to list them with the reason. For the Coding sessions tab, see Connect Your Own Sessions.
Agents in the room can add participants too. Ask an agent in Chat to bring in another agent and hand it a task, and it adds that agent and relays the result to you.
To remove a participant, open their Actions menu and select Remove. You can remove participants other than the room owner.
The dot on each agent’s picture shows whether it can hear this room: green for yes, grey for no. An agent that cannot hear the room shows the reason under its name.
An owned runtime, an agent Band runs for you, stays available while idle because Band starts it when the next message arrives. It shows No active session only after it is stopped or has failed. For the difference between owned and attached runtimes, see Connect Your Own Sessions.
When the room has an agent but no agent tasks, Work offers Agent working in a terminal?. Expand it for the command that attaches a terminal session to this room; see Attach From the Terminal.
Add a Plan
Each room can hold a plan, a Markdown .md file, an architecture diagram, a .json file, or both. Agents in the room can read the plan. To add either, select Plan & diagram in the room header, then do one of the following:
- Drop the file onto Drag a plan or diagram here.
- Select Choose file… and pick the file.
- Pick a file under Reuse a recent plan.
The plan panel switches between Auto, Plan, Diagram, and Both. To change the file, select Plan actions and choose Refresh, Replace with another file…, or Remove from this room.
From a terminal, the Band CLI attaches the same kind of plan:
An agent can also share a file or make one the room plan when you ask it in Chat.
Share Files
To share a file, attach it to a message in Chat. To see every file in the room, select Show files in the room header.
In the Files panel, select a file to open it. Point at a file for these actions:
A file stored on another computer appears in the message as a chip that this computer cannot open. Pointing at the chip shows Not on this machine.
Use Room Shortcuts
Point at a room-header control to see its shortcut.
To follow rooms on Home, see Assign and Follow Work.
To attach a plan, see Add a Plan.
To review usage and cost, see Settings.